How To Install BlueStacks Android Emulator For Windows
BlueStacks Android Emulator For Windows
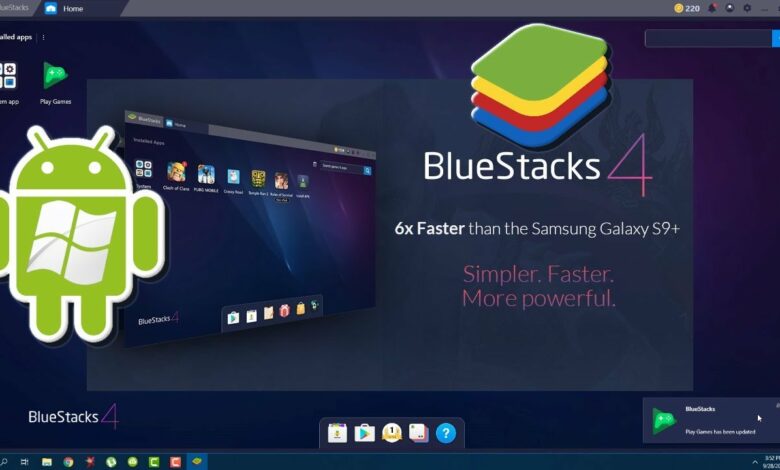
Table of Content
Mobile phones are the main part of our life in the 21st century. Smart working is the demand of the time, and to compete in the market, everyone is moving on to application-based working. There are many users who want to use their smartphone, android, and iPhone, applications on their Operating systems. The android emulators enable users to use their mobile applications on their windows, Linux, or Mac operating systems. These emulators help you to use android applications on your operating system even in a better way. Many companies develop android emulators but the most popular is bluestacks android emulator. In this article, we will explain how to install the bluestacks android emulator on your Windows PC and also inform the system requirement for blueStacks.
Read Also: Best Android Software
How To Install BlueStacks Android Emulator
BlueStacks, as compared to another full-fledged OS emulator, emulates only Android apps on Windows. It’s so simple to use that you won’t even need to know anything about emulators or android to get started. Because Google Play is pre-installed, all you have to do to run Android apps on your computer is install them and access the shortcuts just as you would on the phone.
You can’t go wrong with bluestacks android emulator if you’re seeking a way to install an Android app on your PC rapidly. BlueStacks Premium is available for a fee and includes no advertisements, daily wallpapers, app recommendations, premium support, etc.
Read Also: Wireless Charger For iPhone
Follow the simple steps to Install the blueStacks Android emulator
- First of All login with your google id on the google play store to download and run the application
- Go to blustacks official website www.bluestacks.com and click on the button Download BlueStacks
- The downloading process depends upon your internet speed. As the downloading completes click, the “Save” and then run the bluestacks downloaded file. Sometimes users have to face problems due to your computer antivirus. If such a problem appears turn off the antivirus.
- As the installation is complete, the blueStakcs will start automatically. At this stage, it may take some time. So be calm and let the computer do its work
- Now in bluestacks login with your google play account to access and install other Android applications.
How to Use BlueStacks to Install and Use Android Apps from the Google Play Store
Read Also: Android Software For PC Suits
After BlueStacks is installed on your PC, you may use it to download and install Android apps.
- Select BlueStacks to start it if it isn’t already open and running to access the Play Store, go to Google Play.
- Look for the Android app you wish to install by browsing or searching and checking the app’s details, select it.
- To download the app to your computer, select Install. Within the BlueStacks app, the system displays an icon for each Android app that has been installed.
- To run the installed Android app, select the app icon. Each app in BlueStacks launches in its own tab. To switch between running Android apps, switch between tabs.
- To the right of the Android apps, BlueStacks displays a sidebar with many controls by default. Adjust app volume, alter keyboard controls, grab pictures or recordings, establish your location, shake the device virtually, or rotate the BlueStacks screen with these controls.
- You can pay 3.33$ for the ads-free bluestacks version.
System Requirement For BlueStacks
BlueStacks 4 requires the following to run:
- Updated Windows 7 Or a greater version with graphics driver that is up to date.
- An Intel or AMD Process with 2GB Ram and 5GB Rom.
- To install BlueStacks on your Windows PC, you’ll also need an administrator account. You’ll need Microsoft Windows 10, 8 GB (or more) of RAM, SSD storage, and a powerful graphics card or capability for the greatest experience.
AnyTrans: iPhone Manager for iPhone 12,
System Requirement For BlueStacks For MAC
BlueStacks is also compatible with Mac OS X. You’ll need the following to make it work:
- macOS Sierra (10.12 or later) with the most latest drivers and system software is required.
- 4 GB of RAM and 4GB ROM is required.
- To install BlueStacks on macOS, you’ll need an administrator account, just like on Windows.
Concluding Remarks on BlueStacks Android Emulator For Windows
Not every Android app has a counterpart for Windows, Mac OS X, or the web. BlueStacks is a simple application that allows you to run Android apps on your Windows computer. BlueStacks can run many Android apps at the same time, and each program opens in its own tab. It also has a multi-instance mode, which allows users to run many versions of the same app, which may be appealing to productivity and gaming enthusiasts. BlueStacks also allows you to live stream Android games to Twitch.
More on Guidebits
SBMM Warzone: Skill-based Matchmaking And Stats Check
Twitter Search Update: Easy To Search Other People Tweets
YPost: How to Add Author Syntax And Get Email to YPost?
Top 10 Best Free Movies Online Websites Of 2021
Locast.org activate,Tntdrama.com/activate
D2L MNSU College Dorm Party
Mega Personal App